
This is a repost of a recent article written by me (Whipped Cream Sounds) on Pirate.com. I have expanded on it and included elements they didn’t have the capacity to include on their page to make this a more helpful piece for budding sound designers. This is the complete process from the start that I used to create my own sample packs and market them. You will learn everything you need to make sample packs in this article.
Sound design? Covered. Marketing? Covered. Schedule & Plan? Covered. Creative direction? Covered.
When I mean everything, I mean everything. I have explained the process from the absolute ground up.
Sample & preset packs can be one of the most lucrative projects in your music production career. In my opinion, it’s something every producer should at least attempt once. Even if you make nothing, the mammoth task will provide a great deal of learning and experience that will help you shape the producer you want to be and vastly improve your skillset.
During the creation of my first and second sample packs for sale, I learned more about music production in those couple weeks than I ever have.
Being forced out of my comfort zone and having a deadline made me seek new ways of creating and learning… stuff I’d never thought about before. And, because I stuck to one synth (my favourite Serum), I was able to truly master it – helping me to understand sound design more as a whole.
Anyway… enough salesmanship selling you the idea that making a sample pack is worth it – how the hell do you do it?
In this article, I will cover all the steps you need to create and sell samples all by yourself! I’m going to fully assume you know nothing about this and cover everything. If you want to skip some bits, feel free! There are jump links throughout.
Contents
Pick A Genre, Plan & Create a Timeline
This is pretty basic and obvious, but I cannot stress the importance of this step. DO NOT SKIP IT, you will spend longer than you need and most likely end up not completing what you set out to do.
Picking A Genre
DO NOT pick something that you’re not interested in or something that you think will make money.
This is only going to make you hate the process of creating a pack. It’s a long, difficult and interesting process, so you need to ensure there is some passion behind it, or you won’t get through the difficult hurdles.
So what are you going to make?
- A collection of sweet, mellow lofi packs?
- An acoustic guitar pack?
- A drum pack?
- Or are you going to merge drums, melody loops, recorded instruments, and presets all into one pack?
Make sure you know and write it down!
Creating a Plan
This doesn’t have to be an extensive business plan, but you need a plan. The famous quote “fail to prepare, then prepare to fail” comes true *most* of the time for *most* people. You’re not superman or someone special. You’re a human with lots of space for error. So, even if it is a short plan – get it down on paper and follow it. It will keep you focussed.
To give you some pointers on how to create a sample pack plan, you’ll want to cover a few bases that I’ll list below.
1. How are you organising the pack?
To do this you’ll want to look at a few of your favourite sample packs. How do they organise it? What are the folder names? How many sounds in each category? Is this the best layout or would you prefer it another way?
Find answers to these questions and then apply them to your own sample pack. Do you want to make a small focused sample pack or a huge expansive pack that covers all bases? Figure this out first and plan accordingly.
Doing this will help you prioritise time to specific parts of the pack when you know they are lacking.
For instance, if you want to make a 300 sound pack and you’re breaking it up like:
- 100 drum one shots
- 60 melody loops with stems & MIDIs
- 40 synth presets
- 40 FX
- 30 Bass one shots
- 20 Synth stabs
You will know if you’ve made 40 synths presets and only have 20 drum one shots, you need to start prioritising and working on the drum one-shots + other parts of the pack.
Once you know what you need to make, you can also start to plan out your day into 1-2hr chunks working on specific tasks.
So here’s what a weekly schedule could look like (I have planned it assuming you have a day job):
- Monday – 2hrs sound design drums
- Tuesday – 2hrs loop creation with drums you created yesterday
- Wednesday – 2hrs synth preset creation + 2hrs melody creation
- Thursday – 2hrs FX sound design
- Friday – 2hrs bass sound design
- Sat & Sun – you can choose to work or not (up to how badly you want it done)!
2. Why do people need or want your pack?

What makes your pack different from the hundreds of others out there? Hone in on this and make sure there is a purpose for it. If you’re just making it for fun and to learn more, that’s a 100% valid purpose and you don’t need to go any further.
However, if you want to sell it, then you’ll want to think of a couple of points. I’ll use my most recent pack as an example – Redd Velvet Hyperpop Melody & Serum Presets
At the time, there were barely any Trippie Redd style Hyperpop samples on the market – making it something people would want due to the popularity of the sound. I also absolutely love electronic music production and sound design, so I knew I was going to enjoy the process and learn a lot.
I focussed this pack on melodies because I know beatmakers struggle with melody design and always look for new loops to use (especially unknown ones). They were also all made royalty-free for profit because producers don’t want to siphon their profits off to someone else if they get a placement.
As an EDM producer, it also gave this pack an edge because the sounds were also a lot more unique and better processed than the available packs at the time.
All MIDIs were included to help as starting points and to be used with the included synths. Stems for each melody were additionally included to ensure that the producer had full control at all times. These are all big selling points of the pack and as a result, enticed producers to make the purchase.
Did I do it all correctly? Almost definitely not. But I’m providing these examples so you can take them and use them as a springboard to let your ideas flourish.
3. When is your deadline?

Set a deadline when you want sounds to be done by and keep track of it making yourself accountable! I used a google docs business plan I made for the period I was making sounds and made sure to make at least 5-10 sounds/day.
This is part of a bigger business document I have that helps me keep track of what I’m doing and makes sure I’m on point all the time (even when I’m tired, excuse driven, and don’t wanna do it)!
You might be similar to past me thinking “nah don’t need it mate, it’s all in my head”.
But don’t fall for that trap. Every time I personally make a plan, I get more work done than without it. And I’m certain you will too.
4. How are you going to market it & where are you going to sell your pack?
If you want to sell your pack and get sales you really need a plan for this. You’ll want to set a release date to ensure everything is ready by that date to post etc. You can then build a bigger plan around this release date.
You’ll also want to make demo videos and audio to showcase on the sales page and social media. A lot of time can go into these making sure they’re sized properly for each platform (Facebook, TikTok, and Insta are all different).
And, even more time goes into this if you’re running paid ads/have a social media schedule to follow. To get the most sales you’ll want to make different variations of these videos and see which performs best.
I like to post on reels and TikTok, see which one does best organically, and then use that one for ads. It’s like a free form of testing.
Here’s a list of what you should aim to create:
- A large audio demo of 3-4 tracks, faded into each other, with individual presets/melodies playing after (this is for the webpage & your demo video)
- 3-4 videos showcasing the presets for socials
- A demo video with your logo and some VFX going on
- An over-the-shoulder showcase of your pack creating beats using it
- A video of a smaller taster pack and the number of sounds you get with it
- Other producers using your pack and reacting to it
- A YouTube video of you creating beats using only that pack
Demo of different tracks and sounds
Over-the-shoulder video of creating a track
Short demo track for TikTok insta etc
This will help you in the marketing process because you can test different videos and see which works best. What gets the most clicks, what gets the most sales, comments engagement etc.
You’ll also want to see how you can currently use already created communities such as:
- FB groups
- Forums
You can generate huge downloads from these platforms if you market it correctly, without going against the rules of the forum of the community.
For instance, I personally used Reddit to market my charity sample pack and got 2000+ downloads as well as raised £300+ for charity and collected 2000+ emails for future packs.
I also used Reddit to promote my Piano Chord Poster and gained over 5000+ downloads and 100s of sales.


Additionally, a further step you can take is to get social proof from already big producers. If you don’t know anyone, that’s fine! Just cold reach out to producers who you like. Look for relatively small producers in the scene who are likely to respond. You can give them the pack for free for their feedback in response and use it to market your pack (obviously ask permission from them).
This is what I did to get testimonials from 2 big Lo-Fi producers.

Creating The Sounds
First of all, if you’re fairly new to production, pick one synth, and a couple of plugins, and stick to them. You want to refine the process of creation so it is repeatable and gets results every time.
There will be times you don’t want to make sounds today or even weeks where you don’t. This is where your repeatable process will get you in the zone quickly avoiding that procrastination/anxiety phase.
I would personally pick Serum because it’s extremely versatile and you can make everything you need with the 2 oscillators & effects. Additionally, most producers have Serum so it’s good for marketing to make tutorials, and good for preset packs because most people will be able to use your presets.
How To Create Drum Sounds for Sample Packs
Drums are the bread and butter of most packs, and they can be seemingly impossible to get a grasp of making. But, they’re actually really easy to make (once you know how).
You can:
- Synthesize drums
- Layer foley and add processing
- Find the transient, body, and tails of different sample snares and layer those together
I personally use a combination of the 3 – synthesizing a base layer, then using foley with lots of plugin processing for texture, and occasionally layer with a transient or tail of another sample from a different pack. This is the best way to create unique, interesting drum sounds (IMHO)
Synthesizing Drums
We’re going to be using Serum for this process. To get the best results in Serum you’ll want to understand the noise oscillator and import some foley samples in there for extra texture.
You want this foley pack to include short transient sounds otherwise it won’t work very well. You may want to find a pack like this online, or slice up the current packs you have, making sure to create sub-1-second cuts.
When designing drums, everything can be made out of a sine wave, some noise, enveloping and clever LFOs.
Kick Drums
For a Kick drum, you need 1 sine wave and a short pitch envelope that will rise to create the click, which will then return to the original pitch quickly for the bass.
You can then also add things like short cardboard box sounds or kick transients in the noise oscillator to layer this and make it sound even better.
Envelopes are attached to the coarse pitch of the oscillator to create a click transient for the beater of a Kick. Play around with the settings from +12 – +24 to see which you like the sound of best. Each will produce a different tone so one is not better than the other. Also, change the octaves of the wavetables here to give a lower or a higher sound – depending on the style of Kick you want.

Here are the basic settings in Serum I use to make the base layer of a Kick drum:


Snares
Snares follow the exact same process as above, but with a different base layer in Serum. You are also going to use a sine wave to create snares, but you’ll utilise the noise oscillator and some clever enveloping to create the tail of the snare.
It’s a little more complex, so bear with me.
The body of the snare comes from the sine wave (the weight) and the crack comes from white noise or other sources of noise. You can also use a saw wave or other waves like triangles to give the snare a more tonal sound.
I also personally love to create the base layer in Serum and then use RC-20’s follow feature to add some lofi analog noise on top and create an even crunchier, textured snare.

Here is what you do to create a base layer snare:


Claps
Claps are also created using a sine wave and some white noise. The clap is interesting because you have to simulate the flutter echo effect you get from a clap in the real world, using an LFO volume modulator.
They can be made in Serum pretty easily, and we’ll cover how you can make a clap sound below! To make good claps I personally prefer layering foley with the Serum base layer. They sound more natural and real.
You can only go so far with Serum for this and we’ll get onto the layering after…

Here’s how you create a base layer for the clap:

Hats & Cymbals
Hats and Cymbals are very similar in my opinion. They use comb filtering to create the metallic sound, using a sine wave, with FM modulation and some other clever modulation tricks. Creating Cymbals and Hats for sample packs is the hardest sound to master and there’s a lot that goes into creating a Cymbal sound.
The best way to go about creating them is to first design the base layer in Serum, resample it, then use frequency shifting to alter the tone, layer it with other processed foley, and then play around with a transient shaper like Smack Attack to shape the sound further.
For cymbals you want a crash and then a huge tail; for closed hats, you want a short metallic sound; and for open hats, you want a kind of resonant mid-length sound.
You need to keep this in mind when layering foley and mixing it in.
What is going to be your long tail noise layer? What’s going to be the transient? How are you going to create the metallic rattle inbetween?
All of this can be synthesized and it sounds relatively realistic. But, there will always be some electronic feel if you don’t layer the patch with real world sounds.
You can also make use of Serum FX if you don’t want to have the base layer coming from Serum, but rather, you’d like to use a sample base layer and apply the same processing to it.
Let’s go through how to make the base layer in Serum. After you understand that, you can use any metallic crash, white noise or foley sound to layer through Serum FX and create fantastic-sounding Hats & Cymbals.


Setting The FX


Here is the full list of FX you’ll want on your sound.
Hyper adds more unison and phasing if you want it to. Make sure the detune is all the way down and play around with the number of voices and rate to change the effect. The mix knob is also assigned to macro 2 so you can turn it off and on easily.
Distortion, I’ve gone over above (it’s used as a high-pass filter)
Chorus is used to add yet more phasing and metallic sounds. Play with the rate and the delay 1 settings. Make sure delay 2 is all the way down and don’t put the mix on full. Blend this in to give the sound more texture. It’s not too noticeable so you’ll have to really listen for it, but it does make a difference.
The Filter is the most important part of the sound. You want to make sure you use the comb filter. This will make the Cymbal sound even more phase-y and metallic, giving a more natural crash sound. The cutoff and resonance need to be played around with between sample creations because they affect the texture, tone and style drastically. Envelope 1 is applied to the resonance and the mix. This gives it an extra bite on the attack and also prevents the comb filtering from being too over-bearing


Above is the mod matrix so you can see exactly what each setting is being used for. An extra special tip is to play around with the “curve” setting on the envelopes modulating the cutoff of filters.
In the picture above, you can see the lines ramping up. These can be clicked and shaped to a more curved shape, giving the effect more of an attack
Processing for a more professional & natural sound
To improve the sound of your drum design and make it more professional, you’re going to want to add additional processing and layering.
Layering
You can layer any of the Serum layers above, with a bunch of other foley sounds, creating different fades and tails. For different sounds, you’ll want to use different foley sources.
Think of layering for drums like this:
- Transient – the clicky start to the sound. What does the sound’s transient you’re making sound like? Try to find a transient that will match a Kick or Snare or Hat.
- Body – The meat of the sound. This is the thump of a kick or the crack of a snare. What does this sound like for the sound you’re trying to make? Get a foley sound that’s similar. For instance: this could be a table bang, or a door slamming for a snare.
- Tail – The end of the sound. For a snare/hat this could be white noise, or a deodorant spray style sound. For a kick, a cardboard box thud or pillow thud with a lot of processing could add some rumble.
You can also take the transient, body and tail from other sounds in different packs and mix them together to create a totally different drum sound. This isn’t advised due to copyright, but many sample makers also do this.

For snares you can offset sounds by ms to give a more clap feel/natural feel to the sound. As you can see there are a few layers involved. The hollow crack and bottle opener are the transient; the clap is a 2nd transient nudged to the right to create a natural sound; the swipe is the tail (white noise), and the piano board thud is the body/weight of the sound. This can also be layered with the serum snare patch to make it more digital and harsh. Remeber you need the high, mid and low elements together to create a fully balanced sound.

For the kick the layers can also be offset by ms to add a more room-y/natural feel. The headboard thump is the thump of the kick; the serum patch is the transient and the thump; the driftwood perc provides an offset natural knock sound for more acoustic noises; and the rattle is a kind of acoustic reverb tail. This can be combined with the short reverb below to make it sound more natural (processing header).
Processing
After layering you’ll also want to process these sounds individually with EQ and change the pitch around using a frequency shifter.
Before adding processing I always use the frequency shifter to change the whole, grouped sound and even individual sounds to different tones.

This is exceptionally useful in creating the drum tone you want as it can change the tone of something without introducing artefacts (like pitch shifting does). Moving between -120Hz to +120Hz can give you really boom-y, resonant low-end Kicks, Hats etc. all the way to high-end tonal drum sounds. It’s one of the most important tools in the tone of your drum sounds, so use it.
For the processing, I personally have an audio effect rack set up with loads of different plugin effects I can turn on or off and control from the macros in Ableton. This helps for the quick, repeatable process of creation I was talking about earlier.


Here is the processing I’ll apply after layering:
- Distortion – beef up the sound (use you ears – do you need it?)
- Saturation – beef up the sound (use you ears – do you need it?)
- Transient shaping – add more attack and punch or ease off the harshness. Maybe I want the kick to be shorter sounding – I can alter this with a transient shaper (Smack Attack is great, but there are many free transient shaping plugins available too)
- Compression – glue the entire sound together so it acts and sounds like one sound
- Soft clipping – add more weight/smack to the one shot. I don’t always add this, but it’s on a lot of my sounds seeing as I like the heavy analog sound it provides
- Hard clipping – for really heavy digital sounding drums that hurt. I don’t often use this, but I have it in the chain to turn off or on as I please.
- Reverb – a short 200-300ms room-style reverb to add a room-y sound for a more authentic, natural feel to the drums. This isn’t always added but is nice to have to turn off and on and play around with. I’ll also have a long tail reverb for snares etc.
- Limiting – this is used to bring the sound up to commercial volume and prevent any peaking that will cause unwanted distortion.
How To Create Melodic Synth Patches for Sample Packs
Melodic synth patches are what you’ll use to create the melodies in your sample packs. You can either use presets, or create your own presets, including those in the pack too and use them to create melodies later on. I like to start with creating patches first because later on I can open them up as presets and put my sole focus on writing melodies.
How To Create Bass Sounds for Sample Packs
Bass sounds are pretty easy to create when making sample packs. Each bass sound will take a completely different approach from the last and, unfortunately, there’s no repeatable process you can use to create basses.
If you’re creating dubstep growls, you’ll use a lot more modulation, distortion and filtering techniques, as apposed to something like a smooth RnB bass sound. Making 808’s is similar to creating a Kick drum sound, but elongating the envelopes so you get that hum ring out. If you’re making a synthwave bass, you’ll be using techniques to make the sound more analog and old-school.
The point I’m making is, it entirely depends on the context. Nevertheless, in this article I’m going to cover creating a smooth RnB bass sound to give you an idea of how my brain tackles the challenge of making sounds from scratch.
This RnB bass sound is from my lofi melodies and serum presets pack. You can get the serum presets for free!
How to Create Keys Sounds for Sample Packs
Chords are my favourite thing to design in Serum or other synths. They are the basis for an entire melody and a catchy chord progression is often what makes a melody so memorable for me.
To create chords, you want to think about what kind of chord you want to create.
Do you want to create a pad or a short stab? Do you want it to be a keys sound?
The questions to these answers will determine how you create your patches.
If you are new to sound design, I highly recommend you get a preset pack online and you study the fundamentals of how each sound is made. Look at the PAD sounds and see if there’s a correlation with how the ADSR is set out and what wavetables they use.
Then, do the above for all patches and really dissect how they’re made. This will give you an understanding of how to create the sound you want.
There is no real set way to design chords, unfortunately, so you have to be creative and think about the components that make up the sound. If you don’t understand this yet, don’t worry, with time, you will begin to hear whether a sound is using sine or square waves, what effects it’s using etc.
However, we’ll go through a short example of how I would make a smooth RC-20 style (like the plugin) keys patch so you can understand my thinking behind the process.

First, take a look at this waveform from a real E-Piano sound. As you can see from the transient, we have a sharp attack, about a 40-60% sustain and a short decay, with a short release.


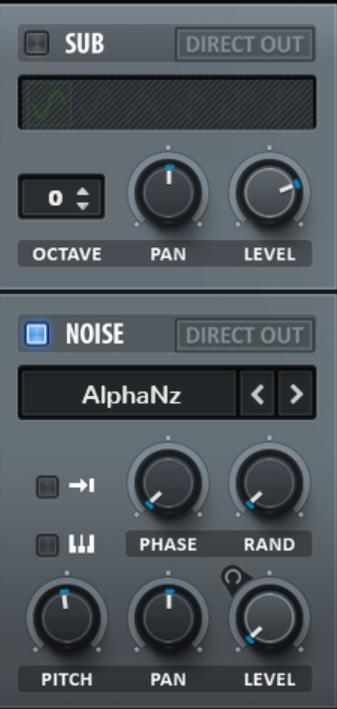
Sub oscillator on sine +1 octave for high register, digital piano-like sound. Noise oscillator using my E-Piano foley sample found in my Lofi sample pack for a more natural E-Piano sound. The one-shot is enabled so it doesn’t continue, and the pitch enabled so it plays in pitch with the rest of the MIDI info. The level is assigned to macro 4 so there’s a switch between the more electronic Lofi feel and a more open, top end sound.

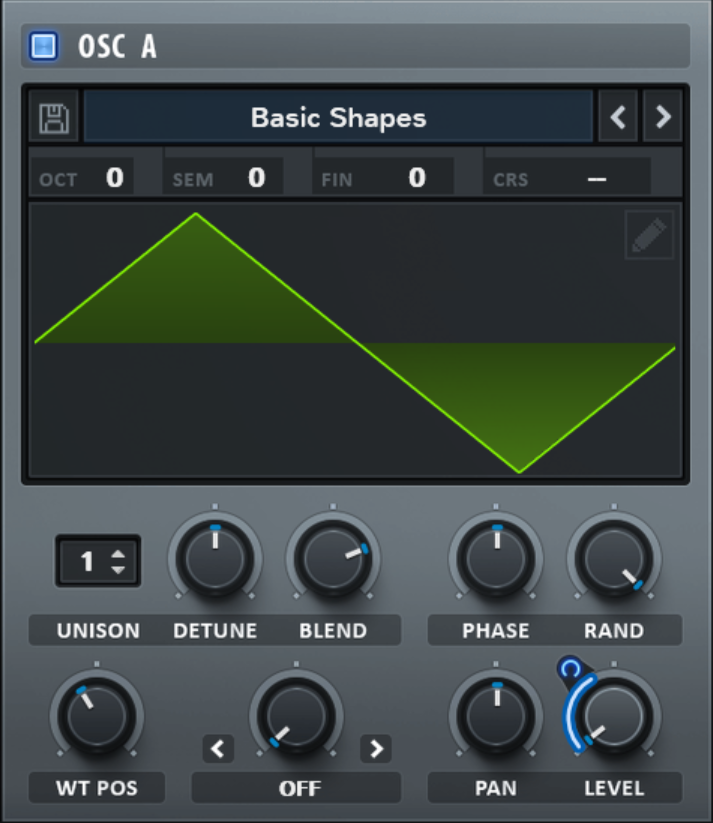
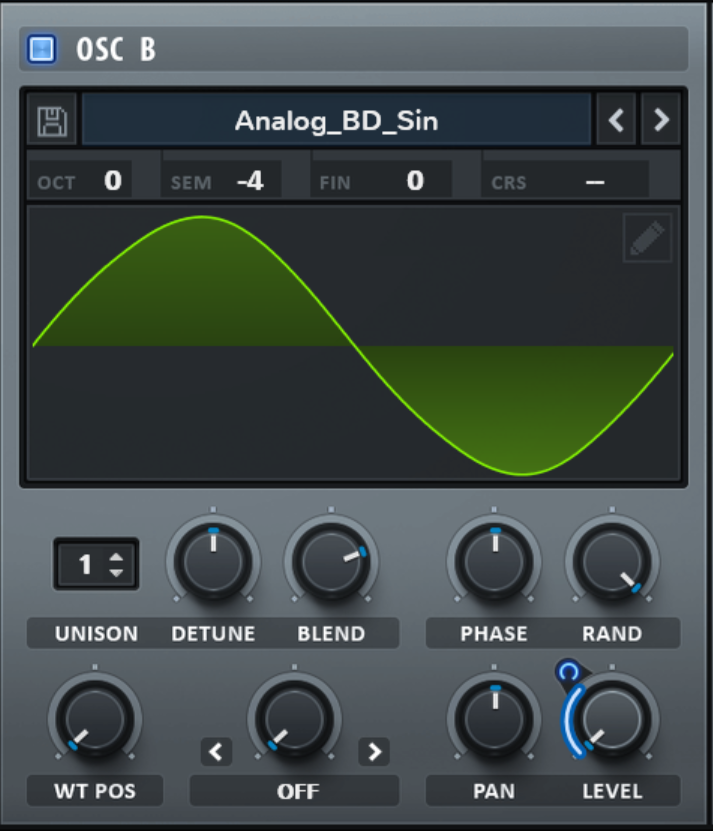
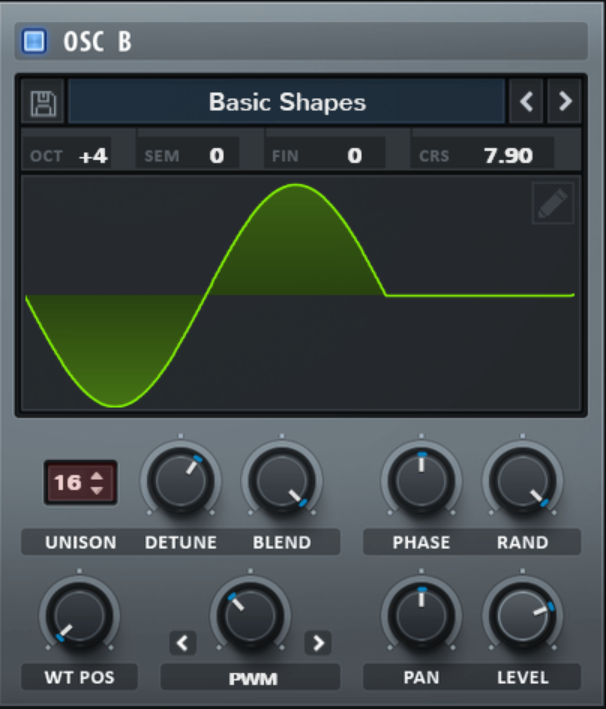
Oscillator A is another sine wave. Analog BD sine, with -1 octave to add a little more bass register to the sound, with +11 on the fine-tuning – giving a more detuned sound between the sub, a & b.

Oscillator B is a triangle wave. This gives similar tones to a sine wave, but provides a more mallet-y like sound. This aids the E-Piano style sound with the top end/hollow tone you get out of an E-Piano. Octave is +1 to add the high register tones, fine-tune at -9 to detune the sound, then a unison of 3 to provide width and detune to the top layer. This gives it a stereo widening effect on the top layer which adds to the depth of the sound.

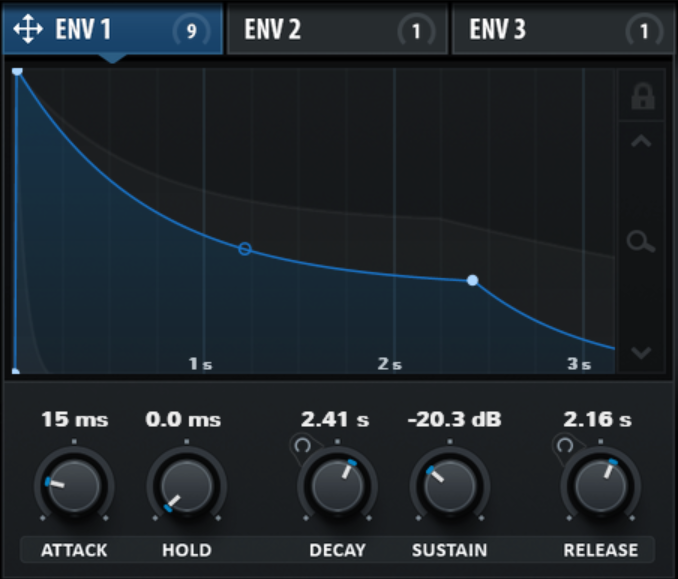
Notice how envelope 1 is set in an extremely similar setting to what I showed above in the E-Piano audio file screenshot.

What we are doing here is emulating the original envelope of an actual audio sample from an E-Piano, as best we can, using the envelope tool.

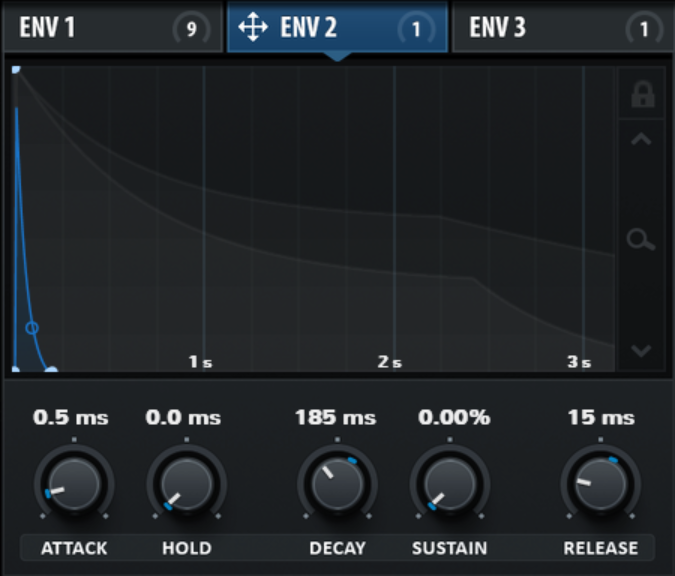
Envelope 2 is a short pluck. This is assigned to the low-pass filter cutoff to create a lofi, pluck-like sound. It allows the full sound to come through momentarily, giving that pluck effect.

The filter is set so that all oscillators pass through it, and the cutoff is assigned to envelope 2 to create that pluck-y lofi sound I was on about above.

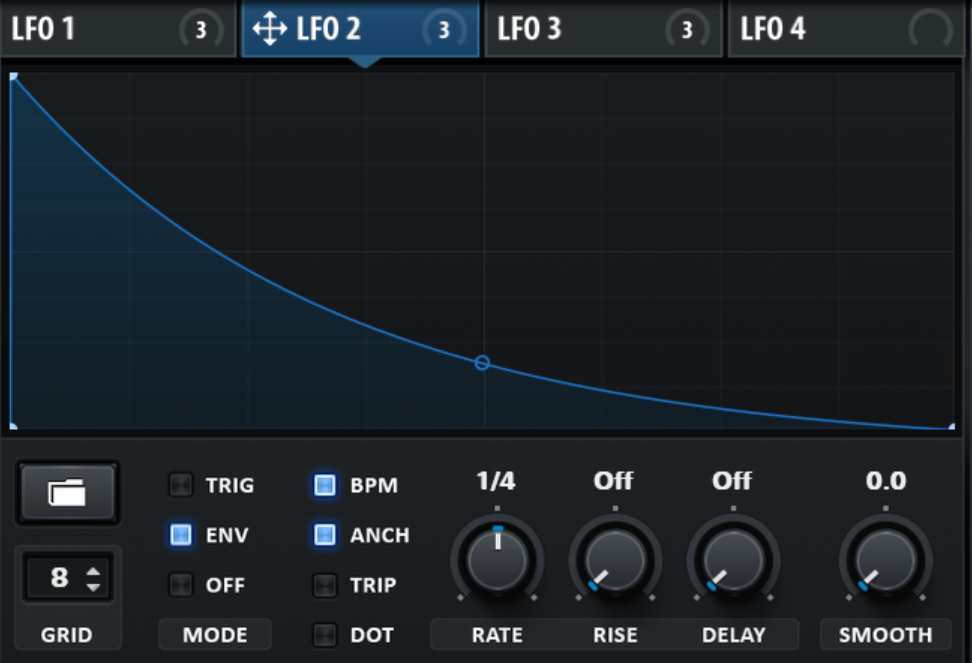
LFO 1 is a shape created to control the master tune. In the modulation matrix, you can map LFOs or envelopes (or anything) to control the master tune. The “aux source” is then changed to macro 3, so when macro 3 is turned up – this adds the LFO master detune on the sound.

Macro 3 is also mapped to the Allpasses filter mix and the “Chaos 1” rate (a completely randomised LFO), found in Serum’s “Global” tab. The Chaos 1 is then mapped to the Allpasses filter to control it at random. Allpasses gives a really detuned and lofi filtering to the sound, that almost sounds like you’re running it through a tape machine.
This makes the sound more analog and authentic.


FX has a “hyper” unit to add extra voices, and a detune effect for width. The mix is about 30%. The filter is used for the “wobble” macro 3. The Allpasses filter is fantastic for creating weird detune sounds. It can also be modulated by LFO 1’s shape to create a detune sound. It’s a cool little trick I use. The compressor is used as an OTT effect to push the sound and juice it up. The reverb is to add space. This is also assigned to macro 1 so you can easily automate the reverb for transitions.


Above is the mod matrix for you to take a look at so you get the full picture of the sound.
How to Create Melodies Quickly & Easily
Creating melodies for samples packs is so much fun! They are extremely creatively expansive and test your production skill a lot. But, sometimes they can take ages to create, or it can take a lifetime to get inspiration to build them.
To tackle this problem, in this section I’m going to share how you can create melodies that sound great, using repeatable frameworks over and over.
If you’re making a sample pack, I highly suggest you follow these processes, otherwise you’ll spend ages not getting anywhere.
With melodies, you have to create multiple parts. You could have leads, chords & basses on their own, but I find it’s better to just create an entire composition in 8-16bars and export the stems for that as a bonus.
In my first pack, I created single-line melodies as well as composition style melodies. And, the composition style melodies were always better. So, for my second melody pack, I used this composition approach only.
For a good melody you want 5 things:
- A killer chord progression
- Addictive bass line
- Catchy lead melody
- Counter melody under the lead
- Soundcapes/textures/FX for flair and uniqueness
Of course, you could add more, but I find that most amazing melodies consist of these 5 factors. So, try to include all of them in your creation, then export them all as stems for individual use.
Creating The MIDI Rapidly
Now you have the basics of what will create a good melody, you need to know how to write them down and quickly. The best way to do this (IMHO) is to use the MIDI roll and piano chord charts.
The best way to do this is by using chord scales and your own voice. Hum along to what you’re making – does the chord or note fit that certain key you want?
I have a great over the should process of me creating a hyperpop melody from scratch using the techniques I’ll explain below.
Not my best melody (those are exclusive to the packs), but it demonstrates exactly what I discuss below in an easy fashion.
1. Choosing a chord scale

The easiest way to build melodies is to start off with a framework, like a scale. So, choose a scale, then look for the chord scale of that scale. For instance, if you’ve chosen C major – you can use the C major chord scale to build a base melody chord progression.
You can also choose more adventurous chord scales like the greek modes, or exotic piano scales. I personally love using Mixolydian, Lydian, Dorian etc. and often use those in my melody design over the basic majors and minors because they sound more colourful.
Once you have your chord scale, build a base layer of chords.
I personally start with the chords and bass, then layer the melody on top, then adding the counter melody and FX after.
SIDENOTE: It’s best to start with presets. These could be the presets you built, or some presets from a pack – it really doesn’t matter.
2. Use MIDI Chord Formulas To Build A Basic Progression
Once you have your chord scale, you can start to use MIDI chord formulas to build any major, minor, diminished or augmented chord you like! They’re extremely easy to remember and you’ll know them off the top of your head after a couple sessions of doing this.
It’s important to remember these, because this is where you’ll start to be able to increase your speed and churn out quality-grade melodies quickly.
Btw I have a full 26 page PDF about creating professional chord progressions that comes with bundled with my Piano Chord Poster, among a number of other useful tools.
Start out by using just major, minor, diminished and augmented chords. Choose a random selection of 3-4 chords from your chord scale and build them as basic 3 note triads.


These work by using semi-tone jumps. So you pick your root note (starting note) and build from there using the formula.
For instance, if I wanted a F major chord. F is my root (R), then I count 4 semi-tones (4 notes), and from this position I count a further 3 semi-tones (4 notes).
You follow this exact process for each of the chords you want to build, always using your starting note as the root note.
Personally I think it’s best to build simple triad chords as a basic melody first, find out what you like the sound of, then start to include extensions and invert your MIDI chords to change the tone.
Here are the most MIDI chord formulas you’ll need:
- Minor – R, +3, +4
- Major – R, +4, +3
- Diminished – R, +3, +3
- Major 7 – R, +4, +3, +4
- Minor 7 – R, +3, +4, +3
- Dominant 7 – R, +4, +3, +3 (as you can see we’re using the minor 7 here)
- Diminished 7 – R, +3, +3, +3
- Major 9 – R, +4, +3, +7
- Minor 9 – R, +4, +3, +7
- Major 7/9 – R, +4, +3, +4, +3
- Minor 7/9 – R, +3, +4, +3, +4
- Major 11 – R, +4, +3, +10 (you may want to invert this)
- Minor 11 – R, +3, +4, +10 (you may want to invert this)
3. Start adding bass notes and inverting your chords
Next you want to thicken up your chord progression by adding bass notes and inverting them.
Bass notes will add a certain thickness to your sound and inversions will change the tone of chords, without changing the key of them.
Inversions are a great tool to use when you know you want that sound, and it fits with your humming, but it doesn’t sound quite right in context as the current chord. If you invert it, this will change the tone and you’ll likely get the end result you initially heard in your head by doing this.
Personally I like to double up the root note of the chord in the 2 octaves below. It looks like this on the piano.

You can also add 3rds, 5ths, 6ths and 7ths to bass. They’ll all sound really cool – just play around with the different notation and see what you like best. Sometimes after you’ve built your melody, trying it in the octave below can make a wicked sounding bass.
I have a full guide that goes far more in-depth on building chord progressions here.
Once you have your bass, start to invert your chords. Doing this is really simple – you just take any of the notes of your chord and you put it down or up an octave. I like to start with the 6ths, 7ths, or 9ths, then begin to mess around with the 3rd or 5th.
4. Build Your Melody & Counter Melody on Top of Your Chords
If you have used a chord scale, you’ll be able to use the scale of that chord scale to build the melody. There isn’t really a secret here… try humming what you hear in your head and match it up with one of the notes in the scale.
Draw this in, then play around with the rhythm and length of the notes. Keep doing it until you have something you like the sound of.
Your counter melody is the exact same process as above. Build another melody in the same scale that counters your current melody. There’s not set way to do this, you will have to hum, listen along and use trial and error until you get something desirable.
5. Adding FX & Soundscapes
My favourite way to attack this section is to resample your melody, cut out bits from it, apply lots of processing and start to place different parts in the gaps of your melody. The idea is to fill out the soundscape, without being to overbearing.
Techniques I like to use to do this are:
- Resample through corpus effect or granular synth
- Add loads of reverb or delay, then resample and reverse this
- Play around with automation in your synths and resample the bits that sound cool
- Add foley in gaps, apply processing and fades, reverse them or automate pitch to texture
There’s no cookie-cutter way to add FX to your melodies. It’s all about trial and error, processing things and having fun.


